
Tuesday, May 30, 2017
Friday, May 10, 2013
The Best T-Shirt Dress - A Tutorial
I want to give a shout out to everyone that has enjoyed my “How To Make The Best Dress Ever” tutorial. Thank you for your thoughtful comments and suggestions on how to make it even better! To date nearly 30,000 people have dropped in to take a look at it. That is pretty awesome!

Have you ever noticed that little girls, particularly when they are young, have protruding tummies? It is for that reason I cut the lower portion of the t-shirt off so that the fabric falls loosely from above the tummy.
Cutting the tee will make the t-shirt dress look more like a dress and less like a t-shirt with a skirt sewn on the bottom of it. I know you hate to cut off a perfectly good t-shirt but it will be worth it and you will be able to use the bottom of the tee for a headband or braided bracelet. Trust me on this one.

“How To Make The Best T-Shirt Dress Ever” is my newest
tutorial. T-shirt dresses are so easy to
make that even a person with very little experience can sew a cute dress. If you already know how to sew you might want to make several.
So without further ado let’s get started!
First you need to gather up your materials.
First you need to gather up your materials.
One t-shirt
½ to 1 yd of fabric depending on the size
Thread and sewing supplies, scissors, pins, tape measure
Have you ever noticed that little girls, particularly when they are young, have protruding tummies? It is for that reason I cut the lower portion of the t-shirt off so that the fabric falls loosely from above the tummy.
Cutting the tee will make the t-shirt dress look more like a dress and less like a t-shirt with a skirt sewn on the bottom of it. I know you hate to cut off a perfectly good t-shirt but it will be worth it and you will be able to use the bottom of the tee for a headband or braided bracelet. Trust me on this one.
We’re going to start by making a well constructed dress. After we finish it up you can embellish it anyway that you like. Okay enough chit-chat from me let's move on.


For the skirt choose a 100% cotton fabric. Do not use solid white or pastels or sheer
fabrics like voile or gauze that you can see thru. Just to make sure that you’ve chosen a good
dress fabric slip your hand in between the layers to be certain you can't see
your hand. If you aren't sure you should probably leave it on the shelf and choose something else.
I think I can safely say that all little girls like bright colors and playful prints.


My pleats are about 1 to 1 ½” wide and a ½” deep. Go ahead and pleat all around the top starting in the center and pleating toward the side seam. You be able to put in 3 or 4 and the 4th one might be a little skimpy but that's okay keep going.
This is sort of an aerial view of the pleats.

When you are finished pleating it will look like this.


Remember that little piece of stabilizer that we ironed in at the beginning of this tutorial? This is going to keep your knit shirt top from stretching when you sew around. Pretty awesome!
Clip all the threads and turn the dress right
side out. On the outside of the dress on the knit top
stitch about 1/4" to 3/8” all the way around.
Start at the side seam and go all the way around.

Now all that is left is the hem and you’re finished!


Edge stitch the end and the length of the tie. Sew as close to the edge as you can catching all the layers. You might want to pin it OR live dangerously like I do and match it as you sew along. Make a second tie – fold, press and sew.

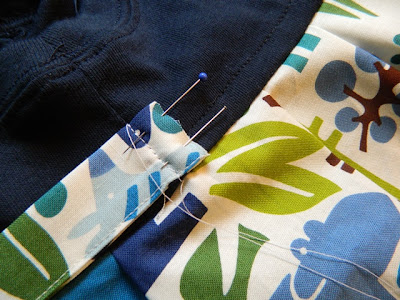
At the underarm of the t-shirt side seam pin one of the ties. The ties will be toward the front which will seem wrong but it’s fine. It is hard to describe so look at the photo below and attach one of the ties.

Now fold the tie back on itself so that the ties are facing the back of the dress and tack it down with machine stitching about ½” from the side seam.


If you would like to make a dress for a little girl who needs one I invite you to click on the little Dress A Girl button at the top right of this tutorial and learn how you can or go to www.DressAGirlAroundTheWorld.com
Also with regard to this t-shirt dress pattern...some mission groups prefer pillowcase dresses as they are easier to pack and take up less space. If you have questions about this contact your Ambassador. If you don't know who your ambassador is please go to www.DressAGirlAroundTheWorld.com to find a list of names.

I’m using a solid navy blue sleeveless top I bought on sale at the end of summer last year. It is 100% cotton.

I think I can safely say that all little girls like bright colors and playful prints.

Ready? Let’s start off by cutting part of the body of the
t-shirt off. Turn the t-shirt inside out
and measure down from the top of the arm opening 3” on both side and mark with
a pin. Your top should look like this.

One of the things that really bugs me about t-shirt
dresses is how the t-shirt stretches when the skirt is attached. Here’s a little trick to eliminate the
problem. Cut two 1” strips of light
weight iron-on Pelon interfacing.
Lay one of the strip of the Pelon across the shirt right above the pins that you used to mark where you are going to cut. Now flip the t-shirt over and do it again on that side. This is the scary part...cut all the way across the t-shirt along the bottom edge of the white strip you just ironed on. You're going to feel like you cut it too short but it won't be. Does it look like this? Good job!

Trim the ends of the interfacing if needed and sew along the side
seams and reinforce with a zig-zag stitch.

Put your bodice to the side while we work on the skirt.

All sizes use the full width of the fabric…selvage to
selvage. By using the selvages it will keep the seam from raveling. Make sure if you have a printed selvage like mine that the seam is deep enough to hide it. On this fabric ½” should be deep enough. You want to sew just over far enough that the white edges are hidden. Here we go...sew top to bottom. Don't worry about the length of your fabric we are going to hem it later.

After you’ve sewn in the side seam press it open so that
it lays flat.
In this tutorial you are going to put the seam on the side so that the front and back of the dress appear seamless. Years ago we might have put
the seam down the back so that it could button or a zipper sewn in but not
today. The skirt will appear to be
virtually seamless with the seam on the side under the arm. I promise you will be thrilled with the results when you finish.
So let's lay the seamed skirt flat on the table. Place a pin on the side opposite the seam to
mark the other half of the dress. Then
two other pins go in the middle of the front and back. I measured with a tape but you can fold it in
half if that is easier. Basically you
want to mark both sides and the center front and the center back. The dress is now marked on both sides and center back and front. Like this.

Now the magic begins.
Lay the dress on the table with the pins and raw edges at the
top. Starting at the center back or center
front (it doesn’t matter) start putting in pleats. No measuring necessary. Start in the center and pinch pleat from the
center toward the side seam, like this. All of the pleats move away from the center.

This is one half of my front.

My pleats are about 1 to 1 ½” wide and a ½” deep. Go ahead and pleat all around the top starting in the center and pleating toward the side seam. You be able to put in 3 or 4 and the 4th one might be a little skimpy but that's okay keep going.
This is sort of an aerial view of the pleats.

When you are finished pleating it will look like this.

Congratulations you just finished the most difficult part
of the dress!
Why pleats rather than gathering you might wonder. Pleats are faster to put in and lay flatter
for shipping, which is a good thing when you are packing hundreds of dresses.
Sew all the way around pressing the pleats down as you sew over them. If you have a serger use it and if
you don’t you can zig zag the seam like I did in this photo. Mine isn't pretty...but it's secure and won't ravel.

Remember that little piece of stabilizer that we ironed in at the beginning of this tutorial? This is going to keep your knit shirt top from stretching when you sew around. Pretty awesome!

Now all that is left is the hem and you’re finished!
My t-shirt is a size 2-3.
So using the pillowcase dress length chart below measure down
the front from the center of the arm opening to the hem. I want my finished dress length to be 20” so
I am going to cut the bottom of the dress off at 21” and that will give me 1”
for a hem.

Size/Years old Finished Dress Length
Infant 14-16”
1-2 years 17-19”
3-4 years 20-22”
5-6 years 23-25”
7-8 years 26-28”
9-10 29-30”
11 31-33”
12-14 34-35”
I cut the excess off with my
rotary cutter or scissors. Set the scrap to the side.
When I learned to sew years ago I was taught to put in a
generous hem so that it could be let down as a child grew. Today sewers are using a new method, one that
I admit I resisted in the beginning….but no longer.
Let’s hem the dress using the Easy Peasy method. Put that tape measure or ruler to the side you won't need it. Fold up ½” all the way around the hem
pressing as you go. I don’t measure I
just fold and press and you can do it too.
After you get all the way around do it again, this second fold will be really
easy. Press as you go. When you finish pressing your hem stitch as close as you can to the fold. That's it you’ve finished your t-shirt dress!
Slip your dress on a little hanger and put it up so you can admire
your work, and have a cup of tea.
I am so proud of YOU!

Feeling confidant? Want to put a little polish on the cute little dress? Let's use that piece of fabric that you cut off the bottom and make some ties for the back.

Cut it in half.
You can make a long tube and turn it inside out OR you can fold and
steam ¼ inch on the sides and one end.
Fold it in half matching the long sides and one end.

Edge stitch the end and the length of the tie. Sew as close to the edge as you can catching all the layers. You might want to pin it OR live dangerously like I do and match it as you sew along. Make a second tie – fold, press and sew.

At the underarm of the t-shirt side seam pin one of the ties. The ties will be toward the front which will seem wrong but it’s fine. It is hard to describe so look at the photo below and attach one of the ties.


Now fold the tie back on itself so that the ties are facing the back of the dress and tack it down with machine stitching about ½” from the side seam.

You did it! Great job!

Also with regard to this t-shirt dress pattern...some mission groups prefer pillowcase dresses as they are easier to pack and take up less space. If you have questions about this contact your Ambassador. If you don't know who your ambassador is please go to www.DressAGirlAroundTheWorld.com to find a list of names.
Saturday, November 24, 2012
Boys in the Background
When I look at many of the photos where
little girls are modeling their cute pillowcase dresses my eyes are always
drawn to the little boys standing in the background peeking out from a crowd or behind a tree. Maybe I notice them because I have sons.

Many people have asked me "what about little boys? Can we do something for little boys?" Well what about little boys? Don't get me wrong I LOVE seeing little girls in their new dresses but I also feel called to make shorts for the 'little boys in the background.' I cannot in good conscience ignore these little boys.

Let’s get started!
First off you want to gather up your materials. So here is a list of what you will need to
get started.

Materials:


Basically I only want to have one large pattern piece rather than the usual two pieces so I pin the front and back pattern together at the side seam. Match the side seam up the best you can. As long as the top and bottom line up then you’re fine.


At this point you can use the tissue pattern OR you can trace the tissue pattern on another piece of paper OR you can trace this pattern on a piece of fabric and use that as a pattern. Fabric patterns are my favorite because you don’t have to use pins when you cut things out AND fabric patterns aren't attractive to cats. If you are making a paper or fabric pattern draw around the pattern piece with a fabric marker, and then put the tissue aside.


Take the pieces apart and you will have to legs. Fold each one in half right sides together, pin and sew the inseam.


I was going to say “let’s take a break and have a cup of tea”
but we are so close to the end let’s just keep going and finish these up. All
that is really left is the elastic. 


Many people have asked me "what about little boys? Can we do something for little boys?" Well what about little boys? Don't get me wrong I LOVE seeing little girls in their new dresses but I also feel called to make shorts for the 'little boys in the background.' I cannot in good conscience ignore these little boys.

When my boys were young our favorite adjective was SHARP
which was the male equivalent of cute. “Those
are sharp little shorts" I would tell them. So I decided that I would write a tutorial for a pair of ‘Sharp Lookin’
Shorts.’ These are nothing fancy or complicated to make but they
are fun, durable and very easy to make. Make them special by adding a pocket or a whistle clip at the waist.

Materials:
1 heavy weight cotton t-shirt
Optional scrap fabric for pattern (I used muslin)
Thread to match
About 20" of 1” wide
elastic
Pins, tape measure, scissors, safety pin
Quite often you can find t-shirts left over from an event
such as a university or fundraising event.
Remember the seat of these shorts will get a lot of wear and probably
get dirty so look for a t-shirt that is dark or a bright color and as heavy
weight as you can find. If you get a chance buy a t-shirt
that is extra wide.
I have a simple short pattern it is an
old McCall’s pattern M6099. My pattern
has a couple bites out of it because my cat Zippy likes the sound of tissue paper but that doesn't really matter. I'll show you why in just a minute.


Basically I only want to have one large pattern piece rather than the usual two pieces so I pin the front and back pattern together at the side seam. Match the side seam up the best you can. As long as the top and bottom line up then you’re fine.

The bottom of the pattern will indicate the hem allowance
and because we at going to use the t-shirt hem as the hem for the short you can
just cut that off or fold it up.

At this point you can use the tissue pattern OR you can trace the tissue pattern on another piece of paper OR you can trace this pattern on a piece of fabric and use that as a pattern. Fabric patterns are my favorite because you don’t have to use pins when you cut things out AND fabric patterns aren't attractive to cats. If you are making a paper or fabric pattern draw around the pattern piece with a fabric marker, and then put the tissue aside.

Your fabric pattern should look like this. It will last forever. Be sure to write the size on it in permanent marker. I'll label mine later.

Now smooth out the t-shirt. I pin the hems together so
that
I can be assured that the legs of the shorts will be the same.

After you do that lay the pattern piece on it. Be sure to line up the bottom of the pattern
with the hem of the shirt. It might not line up perfectly but that’s okay as long as
the edges where you are going to cut line up.
Mine did not line up perfectly you can see a little red peeking out at
the bottom from under the pattern. That’s
okay…I promise.

Cut the shorts out.
You should have 2 large pieces that look like this.


Now turn one of
the legs right side out and put them together with right sides together, one
leg inside the other like this. Line up the legs and put a few pins in to hold
the pieces even.

When you pin the inseams together line the seams so that
they go opposite directions they will eliminate some bulkiness and make it
easier to sew. You can sort of see this
from this side view.

Match the top edges and pin from the waist on one side all
the way down under and then up the other side.
Turn this inside out…ta da there you have a pair of shorts.

Fold the waist down 1 to 1 ¼ inches pin and press. Zig-zag about the waistline casing but remember to leave a couple of inches left unsewn so that you can thread the elastic through.

Cut the elastic and put
a safety pin on one end and push it in the opening and all the way around and
come out the opening. Stitch the elastic
ends together and slip it back into the casing.
Now zig zag that little opening shut.

Spread out the gathers and there you go! A sharp pair of shorts for a little boy that
may have never owned a pair that weren’t hand-me-downs! Good job. Give yourself a pat on the back!


Tuesday, October 30, 2012
Brrr It's Cold Outside

The temperature is dropping in Pineridge, South Dakota. Next week it is going to snow. Winter is rapidly approaching and many of the Lakota children live in homes with inadequate heat if any at all.
In addition to the school at Wounded Knee that I wrote about in my previous post we can send warm clothing to the National American Heritage Association.
In addition to the school at Wounded Knee that I wrote about in my previous post we can send warm clothing to the National American Heritage Association.
National Heritage Association is a global Pine Ridge donation organization--it has a four star charity rating. They know which schools, agencies, or churches have the greatest need.
Here is the address for National American Heritage Association to use if you wish to send warm winter dresses, leggings, hats, gloves and extras.
National American Heritage Association
12085 Quaal Rd
Black Hawk, SD 57718
Or if you you wish to send monetary donations use this address:
Native American Heritage Association
P.O. Box 512
Rapid City, SD 57709
Thank you in advance for your love, generosity, and kind spirit.
The Warm Winter dress tutorial is in the September 2011 archive. Just scroll down the right side column to the Archive and click on 2011 and then September. Drop me a line if you need help finding it. DressAGirl@charlottesville.net.
This is a temperature chart for Pineridge, SD. As you can see the coldest months are November November through March. Brrrrr

Friday, October 19, 2012
Getting Ready for Cold Weather

Winter is creeping up on us again and my thoughts turn toward the Lakota children.
Pine Ridge Reservation, located in South Dakota. The tribal
government records show that there are 38,000 members living on the Pineridge
reservation. Unemployment is over 80%
compared to the rest of the country where unemployment runs below 8%. The average salary is less than $8,000 for a family of
four or even more. Most families do not have adequate heat,
food, water, healthcare or clothing.

Last winter there was a record low temperature of minus 20 degrees!
Wounded Knee District School
P.O.Box 350
Manderson, SD 57756
To send a package by UPS/Fed Ex use this address:
Wounded Knee District School
101 Main St
Manderson, SD 57756
Because of the severe climate and inadequate heat, dresses
need to go as they are made. If you have the means please consider including an
extras- such as panties, tights, leggings, hat, and gloves or mittens.
Thank you in advance your kind heart and generous spirit.

Subscribe to:
Posts (Atom)